A Photographer’s Journey in Arches National Park
Delicate Arch is undeniably one of the most iconic landmarks in the United States, a natural sandstone arch that attracts visitors from across the globe to Arches National Park in Utah. Capturing a photograph of this geological wonder is a must for both professional photographers and casual visitors alike. In this blog, I’ll share the story behind capturing this stunning image and offer tips for photographing Delicate Arch. Insights into the location, and advice for those seeking to preserve its beauty through the lens of their camera.
Whether you’re planning your first visit or returning to capture its magnificence again, this guide will provide everything you need for a successful photoshoot.
Planning Your Trip to Arches National Park
1. When to Visit Delicate Arch for Photography
Timing is everything when photographing Delicate Arch. The golden hours—sunrise and sunset—are the most popular times to capture the arch’s warm tones and dramatic shadows. While sunrise offers solitude and softer lighting, sunset bathes the arch in fiery hues, as the red sandstone glows under the setting sun.
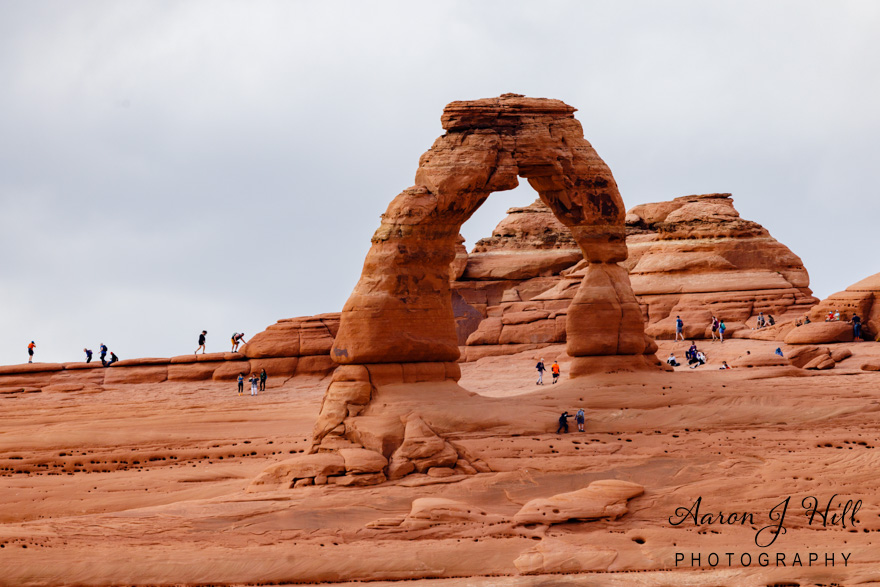
For this particular photograph, I planned my visit in the late afternoon to capture the vibrant colors and the surrounding activity of visitors hiking up to the arch. The overcast sky added a unique, diffused lighting effect, softening the harsh contrasts often seen in desert environments.
2. Essential Gear for Photographing Delicate Arch
To capture a high-quality image of Delicate Arch, I packed the following gear:
- Camera: A DSLR with a versatile zoom lens (e.g., 24-70mm or 70-200mm).
- Tripod: To ensure stability for longer exposures, especially in low light.
- Wide-Angle Lens: To encompass the arch and surrounding landscapes.
- Polarizing Filter: To enhance the colors and reduce glare from the sandstone.
- ND Filter (Optional): Useful for creating long exposures during the day.
I used a medium telephoto lens to compress the scene slightly, drawing attention to the hikers that add a sense of scale to the massive sandstone formation.
The Hike to Delicate Arch
1. Trail Overview
The hike to Delicate Arch is a 3-mile round-trip journey that offers stunning views of Utah’s high desert. The trail gains about 480 feet in elevation and traverses slickrock, sandy paths, and narrow ledges.
For photographers, the trail itself offers plenty of opportunities for unique shots—towering red rock formations, twisted juniper trees, and expansive views of the surrounding La Sal Mountains.
2. Preparing for the Hike
Before starting the hike, I made sure to carry essentials:
- Water: Hydration is critical, especially during warmer months.
- Snacks: Quick energy boosts are helpful on the trail.
- Lightweight Backpack: To carry camera gear and other necessities.
- Proper Footwear: Sturdy hiking boots with good traction.
- Weather Protection: A hat, sunscreen, and layers for sudden temperature changes.
The Perfect Shot: Composition and Technique
Arriving at Delicate Arch, I was immediately struck by its grandeur. Standing 46 feet tall and 32 feet wide, the arch rises dramatically above a natural sandstone amphitheater. The photograph you see here captures not just the arch itself but the essence of its surroundings, including hikers who provide a sense of scale and vibrancy.
1. Finding the Right Angle
Positioning is key to capturing the perfect shot of Delicate Arch. For this image, I set up slightly off-center to highlight the curvature of the arch against the sky. Including the visitors in the frame added both depth and a narrative element—showcasing the arch as not just a natural wonder but a communal experience.
2. Lighting Challenges
The overcast sky that day posed some challenges but also offered opportunities. While I missed the dramatic shadows of golden hour, the diffused light eliminated harsh contrasts, allowing for a more even exposure across the scene. I used a polarizing filter to enhance the warm tones of the sandstone and bring out the subtle textures in the rock.
3. Camera Settings
For this photograph, I used the following settings:
- Aperture: f/8 to ensure sharpness throughout the frame.
- Shutter Speed: 1/250 to freeze any movement from hikers.
- ISO: 200 for a clean, noise-free image.
- Focus Mode: Manual focus for precise control on the arch.
Tips for Photographing Delicate Arch
- Arrive Early: Delicate Arch is one of the most visited spots in Arches National Park. Arriving early ensures you can stake out the best vantage point without interference.
- Include People for Scale: While it’s tempting to capture the arch in isolation, including hikers or visitors adds a sense of scale and life to the image.
- Experiment with Angles: Move around the site to find unique perspectives. Try shooting from below the arch or at its base for a dynamic composition.
- Mind the Weather: Overcast skies, like in this image, can provide soft, even lighting, while clear skies can create dramatic contrasts.
- Practice Ethical Photography: Respect the environment and avoid trampling vegetation or disturbing wildlife.
The Significance of Delicate Arch
Delicate Arch is more than just a geological marvel—it’s a cultural icon. Featured on Utah’s license plates and a symbol of the American Southwest, it embodies the beauty and resilience of the region. For photographers, it represents a rare opportunity to capture a subject that is both timeless and dynamic.
The formation of Delicate Arch is a testament to nature’s artistry, shaped over millions of years by wind and water erosion. Photographing it is not just an artistic endeavor but also a way to honor its geological and cultural heritage.
Post-Processing the Image
After the shoot, I used Adobe Lightroom to enhance the photograph while staying true to the natural beauty of the scene. Adjustments included:
- Contrast and Clarity: To bring out the textures of the sandstone.
- White Balance: Slightly warmed to enhance the red tones.
- Selective Edits: Brightened the hikers and darkened the background to draw focus to the arch.
- Noise Reduction: Applied minimally to retain detail.
Visiting Arches National Park: Final Thoughts
Photographing Delicate Arch is an unforgettable experience. From the challenging hike to the breathtaking views, every moment offers inspiration for creativity. This photograph serves as a reminder of the beauty that lies within America’s national parks and the importance of preserving these treasures for future generations.
If you’re planning a visit to Arches National Park, I highly encourage you to bring your camera, a sense of adventure, and a deep appreciation for the natural world. Delicate Arch is more than just a rock formation—it’s a testament to the enduring beauty of the earth, a subject that will continue to inspire photographers and nature lovers for generations to come.
By optimizing your visit with these tips and strategies, you’ll not only come away with a stunning photograph but also a deeper connection to this incredible landscape.


