Capturing the Colorado
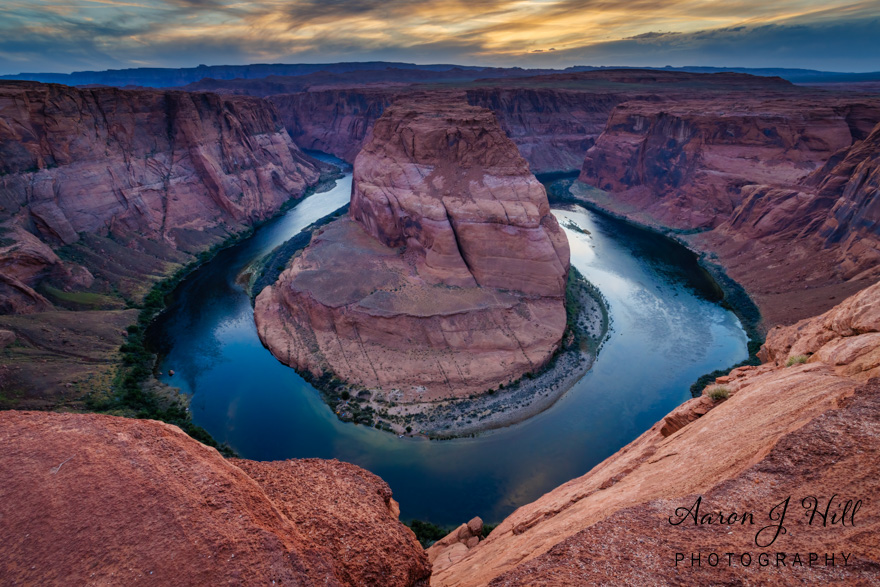
Horseshoe Bend, located just a few miles southwest of Page, Arizona, is one of the most iconic and breathtaking landscapes in the American Southwest. This natural wonder, where the Colorado River takes a dramatic, horseshoe-shaped bend, offers an unparalleled opportunity for landscape photographers to capture the raw beauty of nature. In this blog post, I’ll share my experience of photographing Horseshoe Bend, from planning the trip to the final click of the camera, and provide tips for those looking to capture their own stunning images of this remarkable location.
Planning the Trip
Planning is crucial when aiming to photograph a landmark as popular and visually striking as Horseshoe Bend. I started by researching the best times to visit, understanding that lighting would play a critical role in capturing the perfect shot. The optimal times are during sunrise and sunset when the sun’s rays create dramatic contrasts and highlight the textures and colors of the canyon walls and the river below.
Getting There
Horseshoe Bend is easily accessible by car, located just off U.S. Route 89. After parking in the designated lot, there’s a relatively short but sandy hike to the overlook, approximately 1.5 miles round trip. It’s advisable to wear sturdy shoes, bring plenty of water, and be prepared for the heat, especially if visiting during the warmer months.
The First Glimpse
As I approached the edge of the overlook, the first sight of Horseshoe Bend was nothing short of awe-inspiring. The Colorado River, a deep emerald green, contrasts strikingly with the reddish-orange sandstone cliffs. The sheer drop from the overlook to the river, nearly 1,000 feet, adds to the dramatic effect and emphasizes the scale of this natural marvel.
Setting Up the Shot
When photographing Horseshoe Bend, composition is key. I arrived well before sunset to scout the area and find the perfect spot. Here are some tips for setting up the shot:
- 1. Use a Wide-Angle Lens: A wide-angle lens is essential to capture the entire bend of the river and the surrounding cliffs.
- 2. Sturdy Tripod: Given the low light conditions during sunset, a sturdy tripod is crucial for long exposures to avoid camera shake and ensure sharp images.
- 3. Foreground Interest: Including some foreground elements, such as rocks or vegetation, can add depth and scale to the image. I positioned my camera low to the ground to include some interesting rock formations in the foreground.
- 4. Consider the Sky: The sky plays a significant role in the overall composition. During sunset, the sky often bursts into vibrant hues of orange, pink, and purple. Using a graduated neutral density filter can help balance the exposure between the bright sky and the darker canyon.
Capturing the Moment
As the sun began to set, the sky transformed into a canvas of colors, reflecting off the river and illuminating the canyon walls. The shadows grew longer, adding texture and depth to the scene. This was the moment I had been waiting for. I set my camera to a low ISO, around 100, to minimize noise and used a small aperture, like f/11 or f/16, to ensure a deep depth of field. With my settings in place, I started taking multiple exposures, bracketing my shots to blend later if needed to capture the full dynamic range of the scene.
Post-Processing
Post-processing is an essential step in bringing out the best in your landscape photographs. Here’s how I approached editing my Horseshoe Bend photos:
- 1. Exposure Blending: I used exposure blending to combine multiple shots, ensuring detail in both the highlights and shadows. This technique helps to capture the full dynamic range of the scene.
- 2. Color Correction: Adjusting the white balance and enhancing the vibrancy of the colors can make a significant difference. I carefully enhanced the warm tones of the sunset and the rich greens of the river.
- 3. Sharpening and Noise Reduction: Applying sharpening selectively to the key areas of the image, such as the rock textures and the edges of the river, helps to bring out details. Noise reduction is essential, especially in the shadow areas.
- 4. Final Touches: Cropping to improve composition and adding a slight vignette can help to focus attention on the main subject of the photo.
Reflections on the Experience
Photographing Horseshoe Bend was a profound and humbling experience. Standing on the edge of the canyon, witnessing the interplay of light and shadow, and capturing the scene through my lens, I felt a deep connection to the natural world. It’s moments like these that remind me why I fell in love with landscape photography in the first place.
Horseshoe Bend is not just a place to take a photograph; it’s a destination that evokes a sense of wonder and appreciation for the beauty of our planet. Whether you’re a seasoned photographer or a casual traveler with a smartphone, Horseshoe Bend offers an unforgettable opportunity to witness and capture one of nature’s most spectacular creations.
Tips for Fellow Photographers
- Arrive Early: To secure a good spot and avoid the crowds, arrive well before sunrise or sunset.
- Safety First: Be mindful of the cliff edges; it’s a long drop to the river below.
- Stay Hydrated: The hike can be hot and tiring, so bring plenty of water, especially in the summer.
- Respect Nature: Leave no trace and respect the natural environment.
Conclusion
Horseshoe Bend is a photographer’s paradise, offering endless opportunities to capture the grandeur and beauty of the natural world. By planning your visit, setting up your shot thoughtfully, and applying careful post-processing techniques, you can create stunning images that convey the awe-inspiring essence of this incredible location. Happy shooting!
—
Feel free to share your own experiences or ask any questions in the comments below. I’d love to hear about your adventures and see your photos of Horseshoe Bend!


Pingback: Mountain Bluebird Comprehensive Guide